CREATE A SEAL ON CORELDRAW

seal
Today I will be teaching you guys just a short tutorial on how to draw or create a seal for your designs on labels or stickers etc.
Launch CorelDraw x3, start a new blank document and choose A6 document size landscape.
Draw a rectangle, make it five by one inch and make the rectangle roundness one hundred percent (locate the roundness settings at the top title bar) and type the character above or put any character of your choice, for the font use (Arizonia) as it was used in the sample.
Now let get down to our main seal itself

HOW TO PLACE PLASTIC EFFECT

Plastic effect

Plastic effect is one of the most powerful effect use in designing through Corel Photo-Paint, it is also a related effect to Emboss, Emboss is also related to Plastic but not the same.
Plastic effect can be apply to classic design or logo design, in most occasion it is preferred to be use in logos

           It can be achieve in Corel Photo-Paint but before we could do this, we will need to open CorelDraw and either create an object or type a text for us to be able to apply the plastic effect on it.

You can use any version of CorelDraw or Photo-Paint either X3, X6, X7
Let begin……….

HOW TO CREATE SHINY PARTICLES/VIGNETTE

particles

Vignette particles are shiny particles that can be created in any software listed below CorelDraw, Photoshop, Illustration and more. But today we shall be talking about CorelDraw for a start.

First there is need for us to know about vignette before we could process.
Vignette is also known as a transparent edges of a circle created along with little rectangle behind it, it can also be used in designing of flyers, handbills, calendar and even logo design, let begin with the rectangle background.

EASY GENERATE CALENDAR WIZARD IN CORELDRAW

Hello guys this is a tutorial on how to easy generate calendar in CorelDraw
Some people do create calendar manually by drawing, arranging  in CorelDraw and inserting all of those stuff is quite a bit stress, so today I will be explaining vividly step by step on how to generate calendar. There is a calendar wizard in the latest CorelDraw versions from X10 upward, if am not mistaken.

          Let get started, launch your CorelDraw (Higher Version), go to “Tools locate Visual Basic, then Play”, it will display a dialogue box and select Calendar Wizard, click on run; it will show another dialogue box which carries a title head on it named

HOW TO APPLY CONTOUR EFFECT CORELDRAW

How to apply Interactive Contour effect to an object in CorelDraw
          This tool has the ability to create extra outline or duplicate the same text so that you can apply different colours to it, because outline is different from contour tool, in applying of outline to an object or text you can only apply one colour to it.
The different is clear, with contour tool, you can apply two or more colours to your text.
          And also you can blend the outline of a single object to larger or even smaller size of the object, duplicate the outline in twos or threes depending on the size of the text

GRAPHIC DESIGNS TUTORIALS, ALL FOR BEGINNERS


HOW TO APPLY DROP SHADOW
This tutorial will show you how to create a drop shadow to your text using Corel Draw, mind you some features are different from version to version

There are different technique in creating a drop shadow with paint program like Corel Draw, Photoshop, illustration etc. open a new document in corel draw, go to the text tool and type the word above, when you are done drop the tool using “pick tool” choose the size and the font you want but am using 48.0 points, 

HOW TO CHANGE THE COLOUR BACKGROUND OF A JEPG PHOTO


First your system as to be ON, Corel Draw installed already and set the page size to be A4
Now go to import at the top left of your screen or press “CTRL + I” and import your image in any of your folders, and you can bring down the window and drag the photo into the Corel Draw.

Select the image in Corel Draw and go to Bitmap and Bitmap the image to Red, Blue & Green (RBG or CMYK) or press the shortcut key “ALT + B, Enter, Enter”. Now we are going to Edit the image in Corel Photo Paint, go to the top and select bitmaps on the fourth row EDIT BITMAP

LIGHTING IN COREL DRAW


Spot Lighting in Corel Draw is a very great thing to do, when you want to design.
First there are things you will need to consider when a design is to be made;
Know what to work on and the type of font to use because; mixing of fonts and colour in a design at time will not allow the message in a design to tell or speak on its own.

Let me give you some few step in terms of choosing or mixing colors in a design

LEARN LIGHT FRAMING IN COREL DRAW

Hello guys, welcome to my favorite tutorial..........
In this tutorial, I will show you how to create light effect in Corel Draw. We will learn how make some elements look a bit grumpy.

Ok let’s get started
First you have to get Corel Draw working in your system
SYSTEM REQUIREMENT
Corel Draw x4 or x3
Corel Photo paint
TIME CONSUMING

30-45mins

Final image

light framing in coreldraw

CHANGE THE SIZE OF YOUR DOCUMENT TO A6
Now create a rectangle and fill it with radial effect by selecting or press (F11) on your keyboard to fill
On the type select Radial, for the FROM put BLUE and TO put cyan and OK it, you will something like this 

LEARN HOW TO ADD A RAY EFFECT ON TEXT USING COREL DRAW

1.       FIRST OPEN YOUR COREL DRAW
Launch your CorelDraw, Go to text tool, type any character and make sure you use thick character, this effect, I use just two colours to achieve this

Go to the left tools bar and locate fountain fill or press on keyboard (F11), put radial, Blue and cyan to blend them both just as the above image

TIPS FOR BECOMING SUCCESSFUL IN GRAPHIC WORKS


Living in today’s world, where we see amazing mind blowing ideas of graphic designers, it is impossible to resist yourself from appreciating them. 
We are used to it so much that some time when we come across such brilliant graphic designs, we pass by without giving it a second though. The society you live in, the institution you study, the restaurant you ate at and every other organization around you and associated to you is connected to a graphic designers.

HOW TO CREATE A 3D EFFECT ON COREL DRAW


Create this basic 3D text using CorelDraw. I created this in about 15 minutes. 

CUSTOMIZE THE COLOUR OF YOUR T-SHIRT

How to Edit the colour of your t-shirt in Corel Photo-Paint X3 or any higher versions of Corel instead of using Photoshop or illustrator
And for those that don’t have Photoshop yet, this tutorial will be of great help to you, but I will recommend this for all beginners of CorelDraw
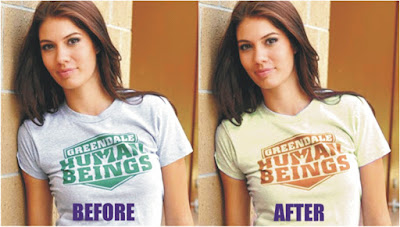
Editing your picture can be fun, when you discover that you can change the colour part of your shirt, and after all this make sure her skin remains the same with her hair but the colour of her T-shirt will change.
For us to achieve this follows these steps above


First launch your Corel Draw X3 (any version of your choice) Click on IMPORT and Select any of your best pictures and import it.
Second step is for you to covert to the image to bitmap by using CMYK for it to be sharper than the original because the effect we are about to apply on it, will change everything entirely. Then make sure your picture is selected